Kubernetes 101
Published:
This article introduces the basics of Kubernetes, including its architecture, key components, and how it can be used to manage containerized applications. This post is based on my understanding of Kubernetes and its docs. Feel free to leave any feedback or corrections in the comments.
1. Introduction to Container Orchestration
The challenge of Managing containerized applications: creating a container image and managing from your local laptop is easy. But managing a cluster of containerized applications across multiple distributed nodes in productions is much harder.
But once you have dozens (or hundreds) of conta`iners running across multiple machines, new problems appear:
- How do you deploy applications with horizontal scalability across multiple servers?
- How do you handle network connection between nodes and among containers?
- How do you handle monitoring, observability to ensure containers and nodes are resilient?
- How do you roll out new versions without service interruption?
- How do you group related containers?
This is where container orchestration comes in. It automates the deployment, scaling and management of containerized applications across a cluster of machines.
Popular container orchestrators includes: Kubernetes (K8s), Google GKE, AWS EKS, Azure AKS, Docker swarm. But we will focus on K8s in this post.
2. Kubernetes Architecture Overview
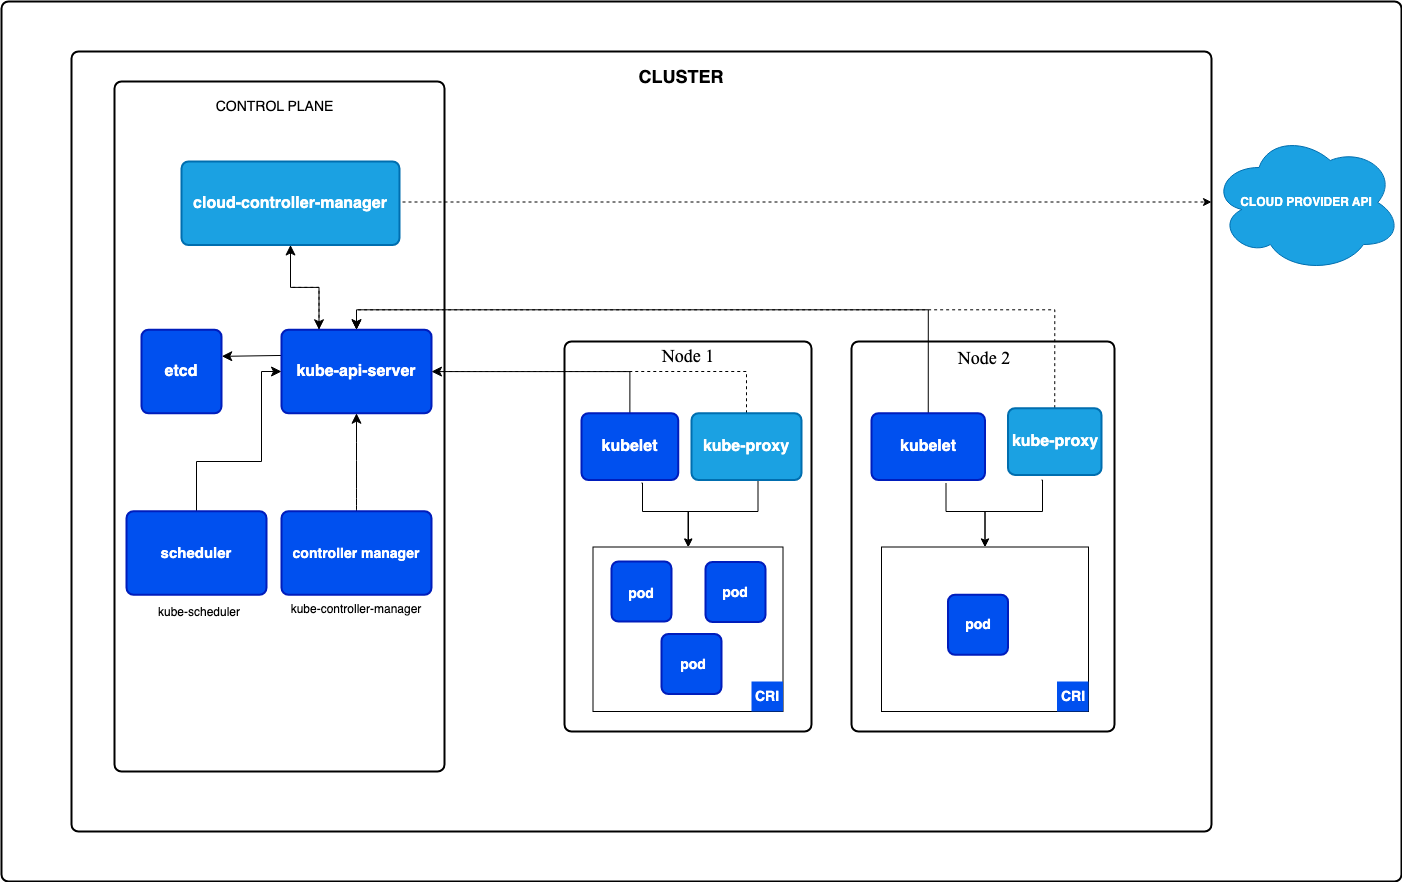
A Kubernetes cluster contains 2 main parts: Control Plane nodes and Worker nodes.
The control plane makes decisions, while Worker nodes actually run your containers.
2.1. Control Plane
The control plane is responsible for managing the entire K8s cluster. It coordinates all activities and communications with worker nodes to ensure desired state of the whole cluster.
The control plane core components:
- kube-apiserver:
- Exposes K8s API
- Acts as the entry point and gatekeeper for the cluster
- Every interaction (from
kubectl,helm chart, automation, …) goes through here. It validates and persists objects to etcd.
- kube-scheduler
- Watches for newly created Pods that haven’t been assigned to a node yet, then picks the best node based on resource availability, taints, affinity rules, etc.
- etcd
- A distributed key-value store.
- This is where entire cluster state (configurations, metadata) lives: nodes, pods, configs, secrets. If etcd goes down, the cluster can’t function.
- kube-controller-manager
- Runs background controller that continuously ensure the actual cluster state matches the desired state. E.g: node health, replica counts, job completion.
- Node controller - notices when nodes go offline
- ReplicaSet controller - ensures the right number of pod replicas are running
- Endpoints controller - populates Service endpoints
- Runs background controller that continuously ensure the actual cluster state matches the desired state. E.g: node health, replica counts, job completion.
2.2. Worker Nodes
Each worker node runs the following components:
- kubelet
- An agent that runs on every node.
- It talks to the API server, receives Pod specs, and ensures containers are running and healthy via the container runtime.
- kube-proxy
- Handles networking and service communication
- Enables communication between Pods and Services across the cluster. It implements the virtual IP abstraction for Services, forwarding traffic to the correct Pod endpoints.
- Container runtime
- The software that actually runs containers (e.g.,
Docker,containerd, …).
- The software that actually runs containers (e.g.,
Note: kubelet and kube-proxy also run on control-plan nodes, but primary role is managing workloads on worker nodes. (since control-plane components themselves)
2.3. Interacting with K8s cluster
Developer interacts with API Server running on control plane node for administration and application management.
The primary tool for interacting with a Kubernetes cluster is kubectl, the CLI client (basically curl).
Users access the deployed applications running on worker nodes via kube-proxy.
kubectl reads from a kubeconfig file (~/.kube/config by default) which contains cluster endpoints and credentials. You can manage multiple clusters using contexts:
# List available contexts
kubectl config get-contexts

# Switch context
kubectl config use-context my-cluster
- Common Q/A:
- What happens if control plan crashes?
- You the administrator ofcourse :D you should have set up multiple control plane nodes for HA. If one goes down, the others take over.
- Also, if a control plane crashes, cluster management halts: existing pods keep running, but no new pods can be scheduled, updated, or deleted, and API requests fail. While worker nodes continue running, the system cannot self-heal or scale, and recovery requires restoring the API server and etcd database to resume operations.
- What happens if control plan crashes?
2.4. How K8s runs your application

Kubernetes deploys workloads by placing containers into Pods
- Pods is smallest deployment unit, pods are scheduled to run on Nodes
- Kubernetes continuously monitors: Application health, Node health, Desired vs actual state
- Kubernetes is declarative, you tell it what you want, not how to do it and the control plane makes it happen.
At a high level, here’s the sequence of events when you run kubectl apply -f deployment.yaml:
  kubectl apply -f deployment.yaml
        │
        ▼
  kube-apiserver   ← validates manifest, stores in etcd
        │
        ▼
  kube-controller-manager  ← ReplicaSet controller notices new Pods are needed
        │
        ▼
  kube-scheduler   ← assigns each Pod to a suitable Node
        │
        ▼
  kubelet (on Node) ← pulls image, starts container via container runtime
        │
        ▼
  Container is running 🚀
- You write a YAML manifest describing the desired state (e.g., “run 3 replicas of my-app using image
my-app:1.2.0”). - You submit it to the API server, which authenticates, validates & persists desired state in etcd.
- etcd maintains the source of truth for the cluster state.
- The scheduler spots the unscheduled Pods in etcd and selects best worker nodes based on constraints, returns the scheduling decision to the API Server.
- API Server persists the scheduling decision back to etcd, triggers kubelet on the assigned node.
- The kubelet on assigned node pulls image and runs workload inside a pod.
- The cluster (kube-controller-manager) continuously monitors the actual state and reconciles any drift - if a container crashes, it’s restarted automatically.
3. Kubernetes Objects
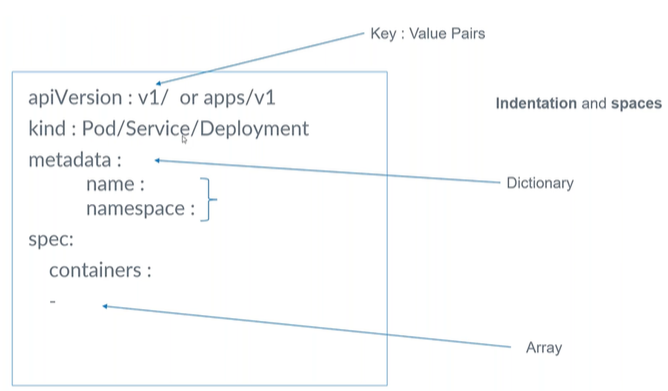
Kubernetes objects represent the resources that define and run applications inside a cluster. They are defined in YAML manifests and managed via the API server.
Every object has:
- apiVersion - Which version of the Kubernetes API you’re using to create this object
- kind - the type of object (e.g: Deployment, Service, …)
- metadata - data that helps uniquely identify the object (e.g: name, namespace, labels, annotations)
- name - unique name for the object within its namespace
- namespace - specifies which namespace the object belongs to (default is
default) - labels - key-value pairs used for grouping and selecting objects (e.g:
app: my-app,env: production)
- spec - the desired state you’re declaring, technical details, including image, applications, ports, etc.
3.1. Pod
- A Pod is the smallest deployable unit in Kubernetes, an abstraction over a container.
- It wraps one or more tightly coupled containers that share the same network namespace (same IP address) and storage.
- Kubernetes manages Pods, not individual containers.
- Pods are ephemeral - it can crash for any reason, kubelet coordinates with API Server to start a new pod if it is managed by ReplicaSet or Deployment.
New pod = new cluster IP address
- E.g: In practice, most Pods run a single container. Multi-container Pods are used for sidecar patterns (e.g., a logging agent alongside your app).
apiVersion: v1
kind: Pod
metadata:
  name: my-app-pod
  labels:
    app: my-app
    env: production
spec:
  containers:
    - name: my-app
      image: my-app:1.2.0
      ports:
        - containerPort: 8080
      resources:
        requests:
          cpu: "100m"
          memory: "128Mi"
        limits:
          cpu: "500m"
          memory: "256Mi"
3.2. ReplicaSet
A ReplicaSet ensures how many replicas of a pod should be running (spec.replicas).
The selector.matchLabels field is how the ReplicaSet knows which Pods it owns. It will create or delete Pods until the count matches replicas. Example:
apiVersion: apps/v1
kind: ReplicaSet
metadata:
  name: frontend
  labels: # labels on the ReplicaSet itself, not the pods it manages
    app: guestbook
    tier: frontend
spec:
  # modify replicas according to your case
  replicas: 3
  selector:
    matchLabels: # which existing Pods belong to this ReplicaSet
      tier: frontend
  template: # When the ReplicaSet needs more Pods, it creates them using this template.
    metadata:
      # new pods created by this ReplicaSet will have these labels
      # must match the selector.matchLabels above
      labels:
        tier: frontend
    spec:
      containers:
      - name: php-redis
        image: us-docker.pkg.dev/google-samples/containers/gke/gb-frontend:v5
- ReplicaSet checks all Pods with label
tier=frontend - If there are less than 3, it creates new Pods using the template
spec.template - Those Pods get the same label:
tier=frontend - Now they match the selector → ReplicaSet manages them.
In practice, you rarely create ReplicaSets directly. You use a Deployment, which manages ReplicaSets for you and adds rolling-update capabilities.
3.3. Deployment
A Deployment manages ReplicaSets and provides a level of abstraction above ReplicaSet, which manages pods.
Creating deployment = creating ReplicaSets + pods
Deployment runs pods/containers, but it won’t expose any IP address or port#. You need to create a Service for that.
apiVersion: apps/v1
kind: Deployment
metadata:
  name: nginx-deployment # name of the deployment object
  labels:
    app: nginx
spec:
  replicas: 3
  # .spec.selector must match .spec.template.metadata.labels
  selector: # specifies a label selector for the Pods targeted by this Deployment
    matchLabels:
      app: nginx
  template: # pod template
    metadata:
      labels: # labels for the pods created by this deployment, must match the selector above
        app: nginx
    spec:
      containers: # list of containers in the pod
      - name: nginx
        image: nginx:1.14.2
        ports:
        - containerPort: 80
Note:
- The
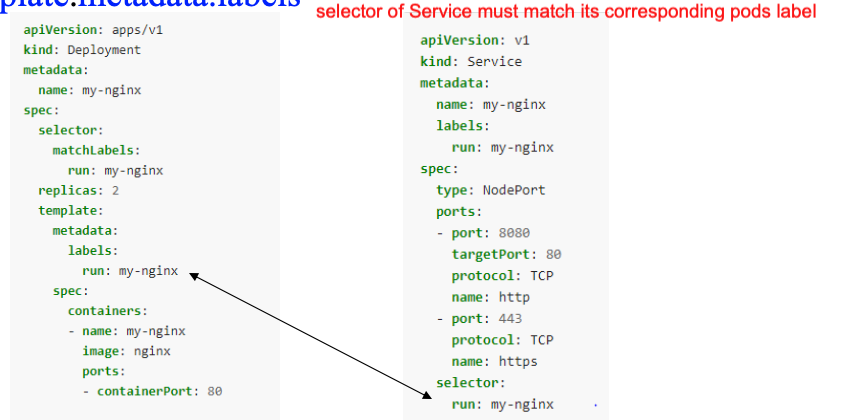
selectorfield is required in a Deployment. It tells the Deployment which Pods to manage. Thetemplate.metadata.labelsmust match theselector.matchLabelsfor the Deployment to work correctly. - You should not create other Pods whose labels match this selector, either directly, by creating another Deployment -> controllers will fight and won’t behave correctly.
3.4. Service
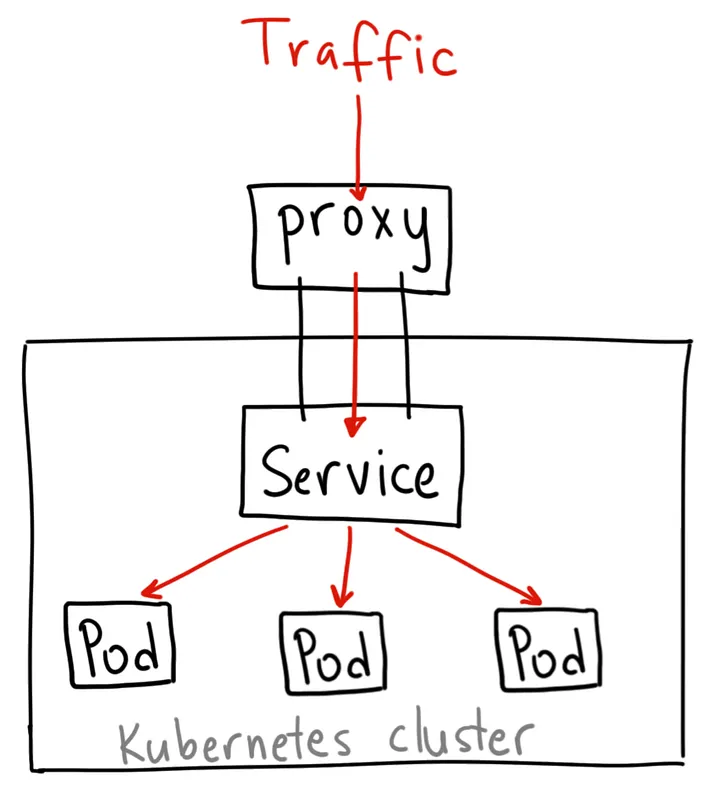
Pods are ephemeral - their IP addresses change when they restart. This is where Services come in.
Service defines a stable DNS name and stable IP address to communicate with a group of pod instances. It acts as a virtual load balancer that distributes traffic to the healthy pods matching its selector.
Service and Pod life cycle are not connected. If a pod dies, the Service and its IP address still stay. So we can use a Service to expose workload inside or outside the cluster.
Within the cluster, Services are discoverable by DNS. A Service named my-app-service in namespace default is reachable at my-app-service.default.svc.cluster.local (or just my-app-service from within the same namespace).
Service types:
3.4.1. ClusterIP
It gives you a service inside your cluster that other apps inside your cluster can access. There is no external access. However, you can access it from outside the cluster using kubectl proxy --port=xxxx for debugging internal pods and development.
apiVersion: v1
kind: Service
metadata:
  name: my-internal-service
spec:
  selector:
    app: my-app # select pods with label app=my-app
  type: ClusterIP
  ports:
  - name: http
    port: 80 # the port that the service will listen on
    targetPort: 80 # the port on the pod that the service will forward to
    protocol: TCP
3.4.2. NodePort
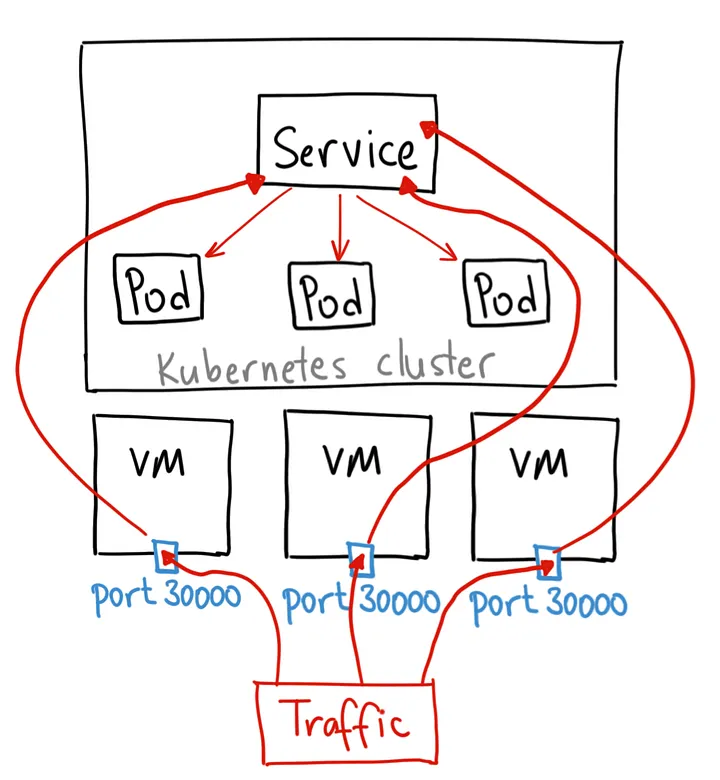
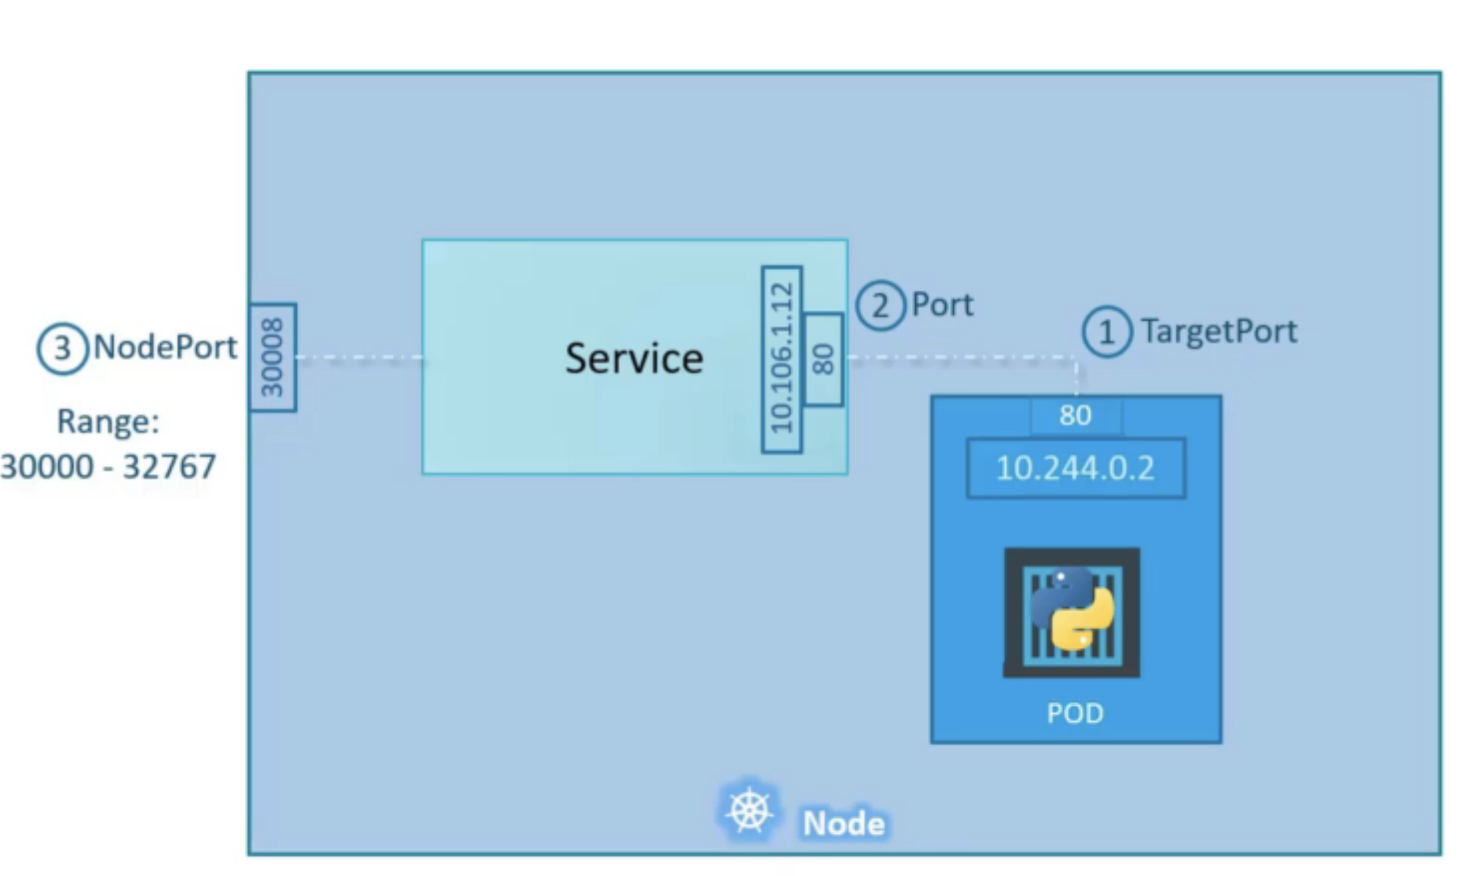
Opens a specific port on all Nodes, and any traffic that is sent to this port is forwarded to the cluster IP service. Accessible from outside the cluster at <NodeIP>:<NodePort>.
Cons: you can only have 1 service per NodePort, range is limited (30000-32767), and you need to manage load balancing across nodes yourself.
apiVersion: v1
kind: Service
metadata:
  name: my-nodeport-service
spec:
  selector:
    app: my-app # select pods with label app=my-app
  type: NodePort
  ports:
  - name: http
    port: 80 # the port that the service will listen on
    targetPort: 80 # the port on the pod that the service will forward to
    nodePort: 30036 # the port on each node to expose (must be in range 30000-32767)
    protocol: TCP
3.4.3. LoadBalancer
Provisions an external load balancer (e.g., AWS ELB, GCP Load Balancer). The standard way to expose a service externally in cloud environments.
If your cluster is in a cloud, then Kubernetes first creates ClusterIP service, then opens high port on each node, and then reaches out to cloud provider’s API and configures a cloud load balancer with the host and port. Adding/removing nodes automatically updates load balancer config
Traffic -> load balancer -> NodePort -> clusterIP service, -> routed to the Pod
Cons: each exposed service with a LoadBalancer will get its own IP address, and you have to pay for a LoadBalancer per exposed service, which can get expensive!
Note: LoadBalancer > NodePort > ClusterIP. When you create NodePort -> it also creates ClusterIP. When you create LoadBalancer, it also creates NodePort and ClusterIP.
apiVersion: v1
kind: Service
metadata:
  name: my-service
spec:
  type: LoadBalancer
  selector:
    app.kubernetes.io/name: MyApp # select pods with this label
  ports: # list of ports to expose
    - protocol: TCP
      port: 80 # the port that the service will listen on
      targetPort: 9376 # port on the pod to forward to
  clusterIP: 10.0.171.239
status:
  loadBalancer: # contains the status of the load balancer provisioned by the cloud provider
    ingress:
    - ip: 192.0.2.127
3.5. Ingress
Services handle east-west (internal) and basic north-south traffic. But for production HTTP/HTTPS routing from the internet, you use an Ingress.
An Ingress resource defines routing rules - path-based or host-based - to route external traffic to the right Services. It requires an Ingress Controller (e.g., NGINX Ingress Controller, Traefik) to be installed in the cluster to enforce those rules.
apiVersion: networking.k8s.io/v1
kind: Ingress
metadata:
  name: my-app-ingress
  annotations:
    nginx.ingress.kubernetes.io/rewrite-target: /
spec:
  ingressClassName: nginx
  rules:
    - host: myapp.example.com
      http:
        paths:
          - path: /api
            pathType: Prefix
            backend:
              service:
                name: api-service
                port:
                  number: 80
          - path: /
            pathType: Prefix
            backend:
              service:
                name: frontend-service
                port:
                  number: 80
  tls:
    - hosts:
        - myapp.example.com
      secretName: myapp-tls-secret
The flow looks like this:
Internet → LoadBalancer → Ingress Controller Pod → Service → Pod
Key advantages of Ingress over a plain LoadBalancer Service:
- One LoadBalancer IP can serve many hostnames/paths (cost saving)
- TLS termination in one place
- Annotations for rate limiting, authentication, etc.
3.6. K8s Volumes
Containers have ephemeral filesystems - anything written inside a container is lost when it restarts. Volumes solve this.
A volume is mounted into a Pod’s container at a specified path. There are many volume types:
emptyDir - Temporary storage that lives for the lifetime of the Pod. Useful for sharing files between containers in the same Pod.
spec:
  volumes:
    - name: shared-data
      emptyDir: {}
  containers:
    - name: app
      volumeMounts:
        - name: shared-data
          mountPath: /data
hostPath - Mounts a directory from the host node’s filesystem. Useful for development but generally avoid in production (breaks portability).
PersistentVolume (PV) and PersistentVolumeClaim (PVC) - The standard pattern for durable storage.
- A PersistentVolume is a piece of storage provisioned in the cluster (manually or dynamically by a StorageClass).
- A PersistentVolumeClaim is a request for storage. Pods reference PVCs, not PVs directly.
# PersistentVolumeClaim
apiVersion: v1
kind: PersistentVolumeClaim
metadata:
  name: my-data-pvc
spec:
  accessModes:
    - ReadWriteOnce   # only one node can mount this at a time
  resources:
    requests:
      storage: 10Gi
  storageClassName: standard
---
# Reference PVC in a Pod
spec:
  volumes:
    - name: my-data
      persistentVolumeClaim:
        claimName: my-data-pvc
  containers:
    - name: app
      volumeMounts:
        - name: my-data
          mountPath: /var/lib/data
Access modes:
ReadWriteOnce- mounted as read-write by a single nodeReadOnlyMany- mounted read-only by many nodesReadWriteMany- mounted read-write by many nodes (requires a distributed filesystem like NFS or EFS)
3.7. ConfigMap and Secret
Hardcoding configuration into container images is bad practice. Kubernetes provides two objects for externalizing config.
ConfigMap - stores non-sensitive configuration as key-value pairs.
apiVersion: v1
kind: ConfigMap
metadata:
  name: app-config
data:
  APP_ENV: production
  LOG_LEVEL: info
  DB_HOST: postgres-service
  config.yaml: |
    server:
      port: 8080
      timeout: 30s
Secret - stores sensitive data (passwords, tokens, certificates). Values are base64-encoded (not encrypted by default - enable encryption at rest in production).
apiVersion: v1
kind: Secret
metadata:
  name: app-secrets
type: Opaque
data:
  DB_PASSWORD: cGFzc3dvcmQxMjM=  # base64("password123")
  API_KEY: c3VwZXJzZWNyZXQ=
You can consume ConfigMaps and Secrets in Pods as environment variables or mounted files:
spec:
  containers:
    - name: app
      image: my-app:1.2.0
      # Option 1: inject all keys as env vars
      envFrom:
        - configMapRef:
            name: app-config
        - secretRef:
            name: app-secrets
      # Option 2: inject specific keys
      env:
        - name: LOG_LEVEL
          valueFrom:
            configMapKeyRef:
              name: app-config
              key: LOG_LEVEL
      # Option 3: mount as files
      volumeMounts:
        - name: config-volume
          mountPath: /etc/config
  volumes:
    - name: config-volume
      configMap:
        name: app-config
A few important notes:
- Never commit Secrets directly to version control. Use a secrets management tool like HashiCorp Vault, Sealed Secrets, or cloud KMS integration.
- Mounting as files is useful when your app expects config files rather than env vars.
- ConfigMap updates don’t automatically propagate to running Pods when consumed as env vars - you need to restart the Pod. When mounted as a file, updates do propagate (with a short delay).
3.8. StatefulSet
Deployments are great for stateless applications. For stateful workloads - databases, message queues, distributed systems - you use a StatefulSet.
StatefulSets provide:
- Stable, unique Pod names -
my-db-0,my-db-1,my-db-2(not random hashes) - Stable network identities - each Pod gets a predictable DNS entry:
my-db-0.my-db-service.default.svc.cluster.local - Ordered, graceful deployment and scaling - Pods are created/deleted one at a time in order
- Per-Pod PVCs via
volumeClaimTemplates- each Pod gets its own persistent volume
apiVersion: apps/v1
kind: StatefulSet
metadata:
  name: my-db
spec:
  serviceName: my-db-service   # headless service for DNS
  replicas: 3
  selector:
    matchLabels:
      app: my-db
  template:
    metadata:
      labels:
        app: my-db
    spec:
      containers:
        - name: my-db
          image: postgres:16
          ports:
            - containerPort: 5432
          env:
            - name: POSTGRES_PASSWORD
              valueFrom:
                secretKeyRef:
                  name: app-secrets
                  key: DB_PASSWORD
          volumeMounts:
            - name: data
              mountPath: /var/lib/postgresql/data
  volumeClaimTemplates:
    - metadata:
        name: data
      spec:
        accessModes: ["ReadWriteOnce"]
        resources:
          requests:
            storage: 20Gi
StatefulSets require a headless Service (a Service with clusterIP: None) to provide the stable DNS for each Pod:
apiVersion: v1
kind: Service
metadata:
  name: my-db-service
spec:
  clusterIP: None        # headless
  selector:
    app: my-db
  ports:
    - port: 5432
When to use StatefulSet vs Deployment:
| Deployment | StatefulSet | |
|---|---|---|
| Pod identity | Random names, ephemeral IPs | Stable names and DNS |
| Storage | Shared or no persistent storage | Dedicated PVC per pod |
| Scaling | Any order | Sequential (0 → 1 → 2) |
| Use case | Stateless apps, APIs | Databases, Kafka, ZooKeeper |
Leave a Comment